

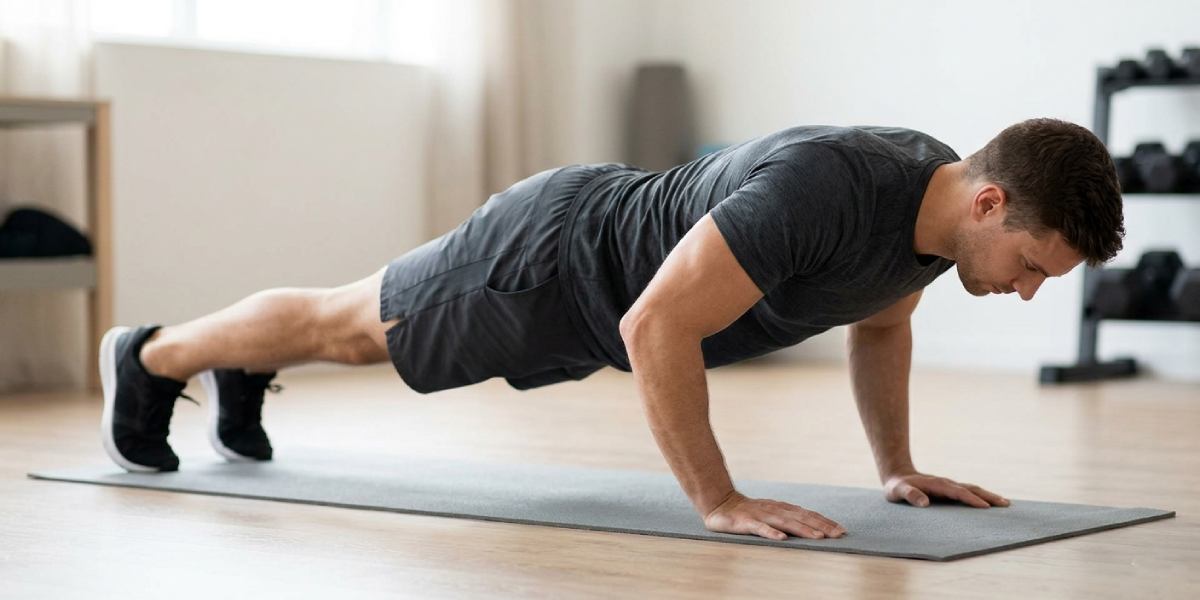
Learning how to do push-ups with perfect form is one of the smartest investments you can make in your fitness journey. Whether you are a complete beginner stepping onto a gym mat for the first time or a seasoned athlete looking to refine your technique, getting your push-up form right determines how much you gain from every single rep — and how well you protect your joints along the way.
The push-up is deceptively simple. Drop to the floor, lower your chest, push back up. Done, right? Not quite. Poor form is the reason so many people plateau, develop shoulder pain, or fail to feel the exercise where they are supposed to.
This guide breaks down the push-up from the ground up — covering hand placement, body alignment, breathing, muscle activation, common mistakes, and variations — so you can get the most out of this foundational bodyweight exercise.
Why Push-Ups Deserve a Place in Every Workout
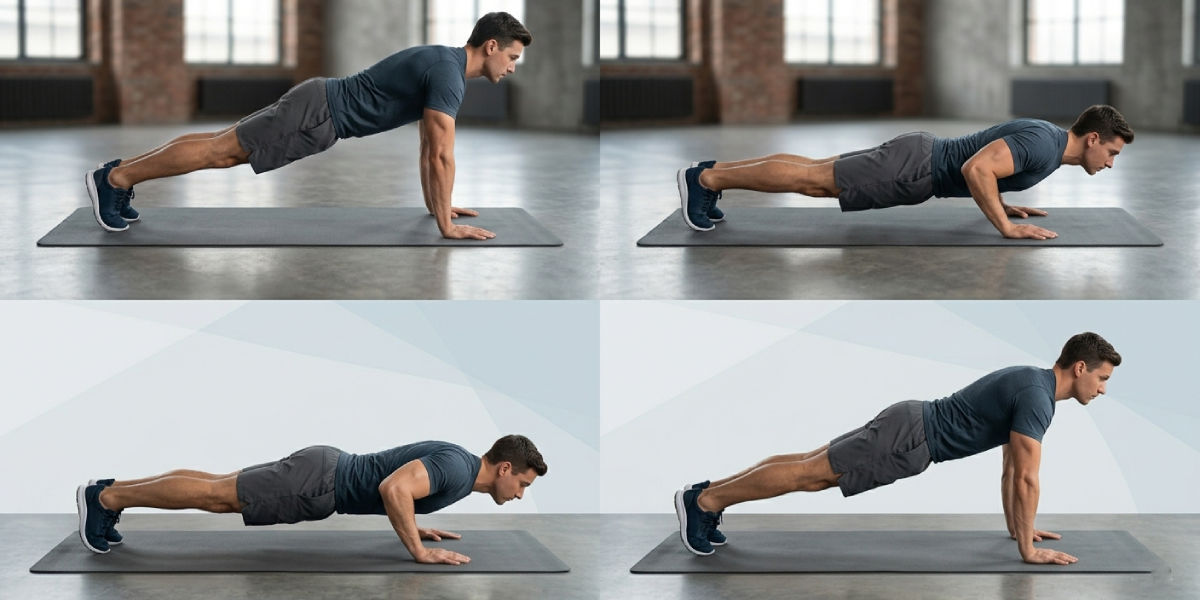
The push-up is one of the most studied and universally recommended bodyweight movements in exercise science. It requires no equipment, no gym membership, and no special setting. You can perform it in a hotel room, a park, or your living room with equal effectiveness.
From a physiological standpoint, the push-up is a compound movement, meaning it engages multiple muscle groups simultaneously. Your chest (pectoralis major), shoulders (anterior deltoid), and triceps are the primary movers, while your core, serratus anterior, and stabilizer muscles work continuously to maintain a rigid, plank-like body position.
Research published in sports and rehabilitation literature consistently identifies the push-up as a reliable upper-body strength and endurance measure. Military fitness assessments, sports combine tests, and physical therapy protocols all use push-up performance as a benchmark. That alone speaks to its credibility as a true test of functional upper-body strength.
Muscles Worked During a Push-Up
Understanding which muscles are involved helps you feel the exercise correctly and identify when something is off. Here is a breakdown of the primary and secondary muscles engaged during a standard push-up:
- Pectoralis Major: The large chest muscle that drives the pressing motion. You should feel a stretch across your chest at the bottom of each rep.
- Anterior Deltoid: The front portion of your shoulder, which assists the chest in pushing the body upward.
- Triceps Brachii: Located on the back of the upper arm, the triceps are responsible for elbow extension at the top of the movement.
- Serratus Anterior: This often-overlooked muscle wraps around your ribcage and stabilizes your shoulder blades against your back. Activating it prevents the scapular winging that leads to shoulder injuries.
- Core Muscles: Your rectus abdominis, transverse abdominis, and obliques fire continuously to keep your spine neutral and your hips from sagging.
- Glutes and Quadriceps: These lower-body muscles contribute to total-body tension, especially when you squeeze them during each rep.
Equipment You Need (Spoiler: Almost Nothing)
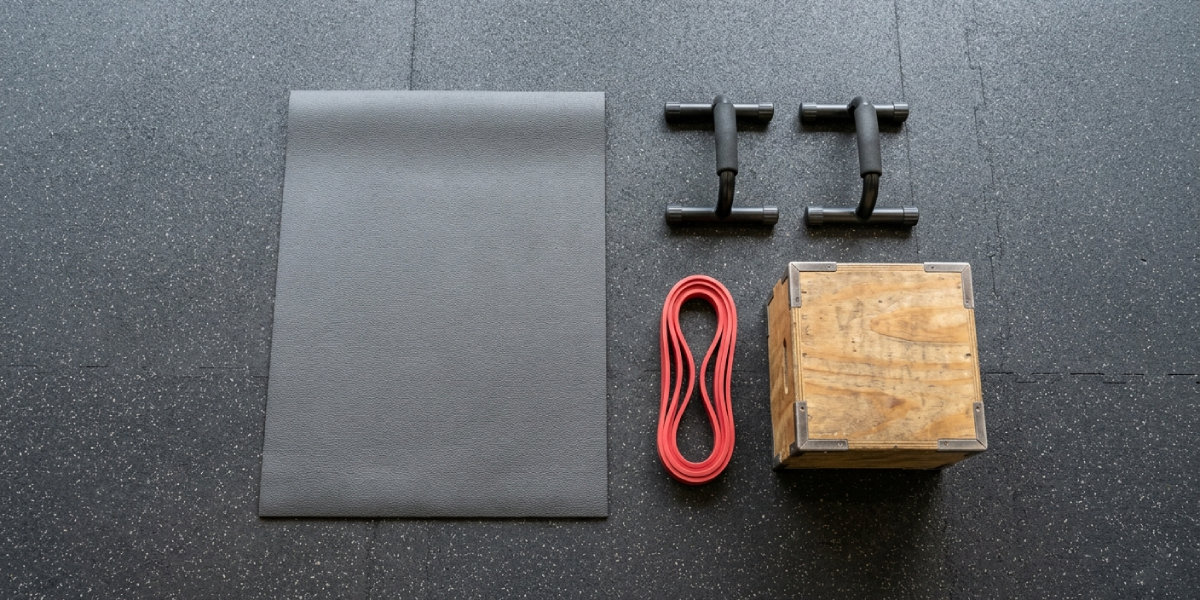
One of the greatest advantages of the push-up is that it requires virtually no equipment. A flat, non-slip surface is all you truly need. That said, a few optional tools can enhance your training:
- Exercise mat: Provides cushioning for your palms and toes, particularly on hard floors.
- Push-up handles or parallettes: These raise your hands off the ground, allowing a greater range of motion and reducing wrist strain for those with mobility limitations.
- Resistance bands: Can be looped across your upper back and anchored under your palms to add progressive overload.
- A sturdy elevated surface: Useful for modified or incline push-up variations.
How to Do Push-Ups with Perfect Form: Step-by-Step
Follow these steps carefully to perform a standard push-up with correct technique from your very first rep.
Step 1: Set Up Your Starting Position
Begin in a high plank position. Place your hands flat on the floor, slightly wider than shoulder-width apart and roughly in line with your chest — not your shoulders or your face. Your fingers should point forward or slightly outward, and your palms should press firmly and evenly into the floor.
Extend your legs fully behind you with your toes curled under. Your feet can be hip-width apart for a balanced base, or together if you want to increase core demand. Your body should form a straight line from the crown of your head to your heels.
Step 2: Engage Your Core and Create Full-Body Tension
Before you move an inch, brace your core as if you are about to take a punch to the stomach. Simultaneously, squeeze your glutes and quads. This full-body tension is not optional — it is what keeps your hips from sagging or piking, which are the two most common form breaks in a push-up.
Think of your body as a rigid plank from head to toe. This position should feel slightly effortful even before you have lowered yourself a millimeter.
Step 3: Set Your Shoulder Blades
Pull your shoulder blades down and back, away from your ears. This scapular depression protects your shoulders and positions your rotator cuff optimally for pressing. Avoid letting your shoulders shrug up toward your ears at any point during the movement.
Step 4: Lower Your Body with Control
Inhale as you begin to lower your body toward the floor. Keep your elbows at a 45-degree angle to your torso — not flared out at 90 degrees, and not pinned tightly to your sides. This elbow path is sometimes called the “arrow shape” when viewed from above, and it is the sweet spot for shoulder health.
Lower yourself until your chest either touches or comes within an inch of the floor. A full range of motion is important for maximizing chest and shoulder activation. Do not cut your reps short by stopping halfway down.
Step 5: Push Back Up with Power and Control
Exhale forcefully as you press the floor away from you and extend your arms. Drive through the heels of your hands. At the top of the movement, think about pushing your upper back toward the ceiling slightly — this protects the shoulder joint and fully engages the serratus anterior.
Do not lock your elbows out aggressively at the top. Keep a very slight bend to maintain joint-friendly tension throughout the set.
Step 6: Reset and Repeat
Pause briefly at the top, recheck your body alignment, and descend into your next rep. Maintain the same level of full-body tension on every repetition. Quality always beats quantity — ten perfect push-ups outperform twenty sloppy ones every time.
Common Push-Up Mistakes and How to Fix Them
Even experienced exercisers fall into these habits without realizing it. Understanding them helps you self-correct immediately.
Sagging Hips
If your lower back arches and your hips drop toward the floor, your core is not fully engaged. The fix: squeeze your glutes harder, brace your abs, and consider adding dedicated plank holds to build core endurance before attempting high-rep push-up sets.
Piking at the Hips
The opposite of sagging, piking means your hips rise into a tent shape during the movement. This typically means fatigue is setting in. Stop the set before form breaks — incomplete reps with poor alignment are never more productive than fewer quality reps.
Flared Elbows
Letting your elbows point out to the sides at 90 degrees places excessive stress on the shoulder joint. Consciously tuck your elbows to that 45-degree angle on every single rep until it becomes automatic.
Looking Too Far Forward or Down
Your head should be in a neutral position, meaning your gaze falls about 12 to 18 inches in front of your hands. Cranking your neck up or tucking your chin to your chest both compromise spinal alignment and can cause neck discomfort over time.
Incomplete Range of Motion
Half-reps feel easier but deliver a fraction of the muscular stimulus. Lower fully until your chest nearly grazes the floor on every rep. If you cannot achieve full depth while maintaining a straight body, modify the movement with an incline push-up instead of truncating the range.
Rushing the Reps
Speed is the enemy of form and muscle engagement. A controlled tempo — roughly two seconds down, one second pause, two seconds up — dramatically increases muscle fiber recruitment and reduces injury risk.
Push-Up Variations for Every Fitness Level
The classic push-up is just the beginning. Incorporating variations keeps your training progressive and targets the muscles from different angles.
Beginner: Wall Push-Up
Stand facing a wall, place your hands shoulder-width apart at chest height, and perform the pressing motion while standing. This dramatically reduces the load and allows you to practice perfect alignment before moving to the floor.
Beginner: Incline Push-Up
Place your hands on a sturdy elevated surface such as a bench, desk, or step. The higher the surface, the easier the movement. This is the ideal progression between wall push-ups and floor push-ups.
Intermediate: Knee Push-Up
Performed with your knees on the floor instead of your toes. Maintain a straight line from your head to your knees and avoid sitting your hips back. This is a legitimate stepping stone, not a lesser exercise.
Intermediate: Wide-Grip Push-Up
Place your hands wider than shoulder-width to shift emphasis onto the pectoralis major, particularly the outer chest fibers.
Intermediate: Diamond Push-Up
Bring your hands together beneath your chest, forming a diamond shape with your thumbs and forefingers. This variation heavily targets the triceps and inner chest.
Advanced: Decline Push-Up
Elevate your feet on a bench or step to shift the load toward your upper chest and anterior deltoids. This variation mimics the incline press movement pattern.
Advanced: Archer Push-Up
Place one hand far to the side while keeping the other in a standard position. As you lower, shift your weight toward the hand that stays beneath you, dramatically increasing unilateral load. This is a powerful stepping stone toward the one-arm push-up.
Advanced: One-Arm Push-Up
The pinnacle of bodyweight pressing. Requires exceptional core stability, shoulder strength, and hip rotation control. Work up to this progressively through archer push-ups and weighted standard push-ups.
How to Build a Push-Up Progression Plan
Progressing in push-ups follows the same logic as any strength training: apply enough challenge to create adaptation, then increase the challenge over time. Here is a simple framework:
| Level | Starting Point | Weekly Goal | Progression Trigger |
|---|---|---|---|
| Beginner | Incline or knee push-up | 3 sets of 5 to 8 reps | Reach 3 sets of 12 with perfect form |
| Intermediate | Standard floor push-up | 3 to 4 sets of 10 to 15 reps | Reach 4 sets of 20 with full range of motion |
| Advanced | Weighted or decline push-up | 4 to 5 sets of 15 to 25 reps | Move to unilateral variations |
Rest 60 to 90 seconds between sets for strength-focused work, or 30 seconds or less for muscular endurance and conditioning. Train push-ups two to four times per week, allowing at least 48 hours between sessions that work the same muscles.
Breathing and Mind-Muscle Connection
Breathing is technique. Inhale on the way down, exhale on the way up. This respiratory pattern naturally increases intra-abdominal pressure during the lowering phase, supporting your spine, and then releases that pressure as you press.
Never hold your breath through multiple reps — doing so can cause a rapid rise in blood pressure and lightheadedness.
The mind-muscle connection refers to consciously directing your focus to the muscles you want to work. Studies in exercise science suggest that actively thinking about the target muscle during a movement increases its activation. As you press up, visualize your chest muscles squeezing together.
As you lower, feel the stretch across your pectorals. This attentional focus is a simple but genuinely effective technique used by competitive bodybuilders and physical therapists alike.
Push-Ups and Overall Health
Push-ups are not just a strength tool — they are an indicator of cardiovascular health. A 2019 study published in JAMA Network Open found that men who could complete 40 or more push-ups in a single session had a significantly lower risk of cardiovascular disease events compared to those who could complete fewer than 10.
While the study does not prove that push-ups prevent heart disease, the correlation underscores that upper-body muscular endurance reflects broader physical fitness.
Incorporating regular resistance training like push-ups into your routine supports bone density, metabolic health, joint integrity, and functional strength for everyday tasks. If you are tracking your broader health and wellness progress, push-up performance is one of the cleanest, most accessible metrics you can use.
Push-up training also pairs well with monitoring body composition. If you are curious about where you currently stand, tools like a BMI calculator can offer a useful data point as part of a broader health picture, helping you set realistic fitness benchmarks alongside your strength goals.
Integrating Push-Ups Into Your Training Schedule
Push-ups are versatile enough to fit into almost any programming structure. Here are a few practical approaches:
- As a warm-up: Two sets of submaximal push-ups activate the chest, shoulders, and triceps before heavier pressing work.
- As a finisher: A single max-effort set at the end of an upper-body session builds muscular endurance and metabolic conditioning.
- In a full-body circuit: Alternating push-ups with rows, squats, and core work creates an efficient, equipment-free full-body session.
- In a dedicated push-up program: Programs like the 100 push-up challenge or grease-the-groove protocols (frequent submaximal sets throughout the day) can rapidly improve volume capacity.
Frequently Asked Questions
How many push-ups should a beginner aim for?
Beginners should focus on quality over quantity. Starting with 3 sets of 5 to 8 perfect-form push-ups — or the appropriate modification for your level — is far more productive than attempting 30 sloppy reps. Build volume gradually as your technique and strength improve.
What is the correct hand placement for push-ups?
Place your hands slightly wider than shoulder-width apart, roughly at chest level when you are in the lowered position. Your fingers should point forward or at a slight outward angle. Hands placed too high toward your shoulders increase shoulder impingement risk; hands too wide reduce triceps contribution and can stress the wrist.
Can push-ups build significant muscle mass?
Yes, push-ups can build meaningful muscle, particularly in the chest, shoulders, and triceps, when performed with sufficient volume, progressive overload, and adequate recovery. To continue building muscle, you need to progressively increase difficulty through weighted push-ups, decline variations, or unilateral progressions as standard push-ups become easier.
Why do my wrists hurt during push-ups?
Wrist pain during push-ups usually results from insufficient wrist flexibility, poor hand placement, or excessive wrist extension. Try using push-up handles or parallettes to keep the wrist in a neutral position. You can also perform push-ups on your fists if a flat surface is unavailable. Incorporate daily wrist mobility drills to improve flexibility over time.
How often should I do push-ups?
Most people benefit from training push-ups two to four times per week, allowing at least 48 hours of recovery between sessions that stress the same muscles. Daily push-up protocols can work if volume per session is kept low and submaximal, such as in grease-the-groove approaches, but high-volume daily push-up training without recovery leads to overuse and diminishing returns.
What is the difference between wide-grip and narrow-grip push-ups?
Wide-grip push-ups emphasize the outer chest and reduce triceps involvement. Narrow-grip or diamond push-ups shift the load heavily onto the triceps and inner chest. Standard push-ups with hands at shoulder width offer the most balanced stimulus across all pushing muscles and are the best foundation for beginners and intermediates.
Are push-ups enough for a complete upper-body workout?
Push-ups address all the major pressing muscles but do not train the pulling muscles of the upper back and biceps. A balanced upper-body program should pair push-up variations with rowing movements such as bodyweight rows, resistance band rows, or dumbbell rows. Neglecting pulling exercises while over-training pushing movements can lead to postural imbalances and shoulder problems over time.
How do I know if my push-up form is correct?
Correct push-up form means your body forms a straight line from head to heels, your elbows track at a 45-degree angle to your torso, your chest nearly touches the floor at the bottom, your hips neither sag nor pike, and your shoulders stay down away from your ears throughout every rep. Recording yourself from a side angle is the most reliable way to self-assess and identify form issues that you cannot feel in the moment.
Do push-ups burn calories effectively?
Push-ups burn calories primarily by building lean muscle mass, which increases your resting metabolic rate over time. The direct caloric burn of push-ups is modest compared to cardiovascular exercise, but the long-term metabolic benefit of increased muscle tissue is significant. For body composition goals, push-ups work best as part of a program that combines resistance training with appropriate nutrition and overall physical activity.
Can push-ups help with posture?
Push-ups can support better posture when performed correctly and balanced with rowing exercises. The serratus anterior and lower trapezius muscles — both activated during push-ups — play a key role in stabilizing the scapulae and preventing the rounded-shoulder posture associated with prolonged sitting. However, doing push-ups without also strengthening the upper back can worsen anterior dominance and contribute to poor posture over time.