
The hip thrusts exercise is one of the most effective movements you can add to your training routine to build glute strength, improve athletic performance, and develop a well-rounded lower body.
Whether you are a beginner stepping into a gym for the first time or an experienced lifter looking to optimize your programming, mastering the hip thrust gives you a direct, efficient path to stronger, more powerful glutes.
This guide walks you through everything you need to know — from the science behind why hip thrusts work so well, to step-by-step technique instructions, common mistakes to avoid, and the best variations to keep your training fresh and progressive.
What Are Hip Thrusts and Why Do They Work So Well?
Hip thrusts are a barbell or bodyweight exercise that targets the gluteus maximus — the largest muscle in the human body — through a full range of hip extension.
Unlike squats or deadlifts, which place the glutes in a mechanically disadvantaged position at peak contraction, hip thrusts load the glutes most heavily when they are fully shortened (at the top of the movement). This makes them uniquely effective for building both size and strength in the posterior chain.
Research in strength and conditioning has consistently shown that hip thrusts produce significantly higher levels of glute activation compared to squats alone.
When combined with squat-based movements in a well-rounded exercise program, hip thrusts can accelerate glute development and improve performance in sports, running, and everyday functional movement.
Beyond aesthetics, strong glutes play a critical role in protecting the lower back, improving posture, reducing knee pain, and powering explosive athletic movements. Building glute strength through hip thrusts is genuinely one of the smartest investments you can make in your long-term health and performance.
Equipment You Need to Perform Hip Thrusts
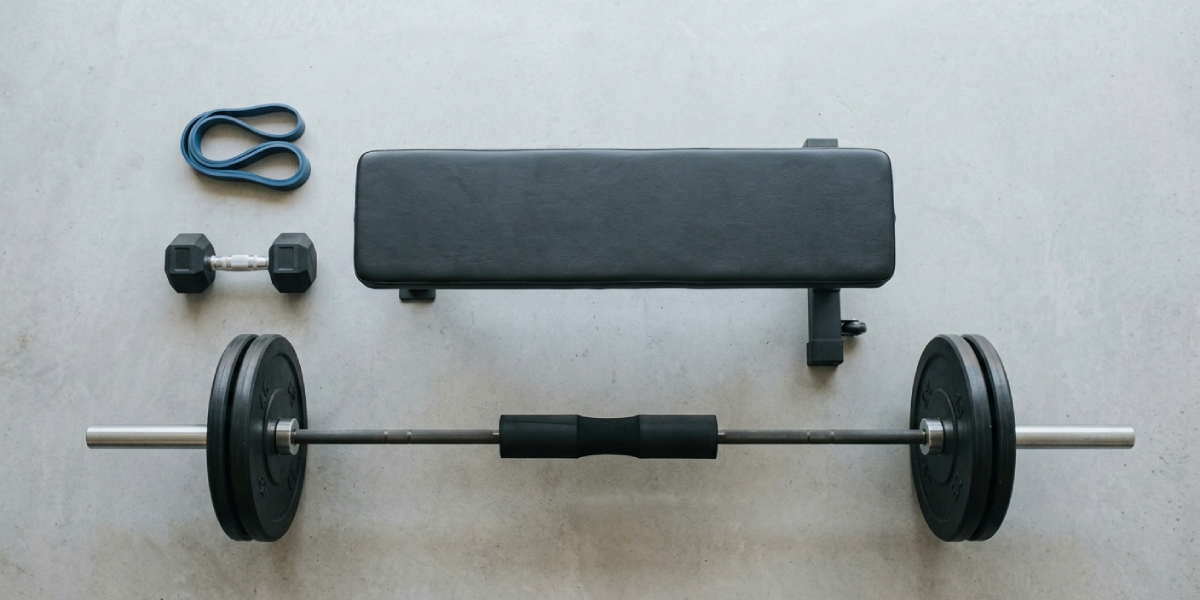
One of the great advantages of the hip thrust is its flexibility in terms of equipment. You can perform effective variations at virtually any stage of your fitness journey. Here is what you may need depending on the variation:
- Bodyweight: No equipment required — ideal for beginners learning the movement pattern.
- Resistance band: A loop band placed above the knees adds tension and increases glute activation without loading the spine.
- Barbell and weight plates: The standard loaded hip thrust uses a barbell placed across the hips, supported by a bench at the upper back.
- Weight bench or box: A stable bench set to a height that places your shoulder blades at the edge when seated on the floor is essential for barbell hip thrusts.
- Barbell pad or foam cushion: Provides comfort and protects the hip bones when using heavier loads.
- Dumbbell: A practical alternative for home gyms or when barbells are unavailable.
Step-by-Step: How to Perform the Barbell Hip Thrust with Correct Form
Proper form is non-negotiable. Performing hip thrusts with poor mechanics reduces their effectiveness and places unnecessary stress on the lumbar spine. Follow these steps carefully to get the most out of every rep.
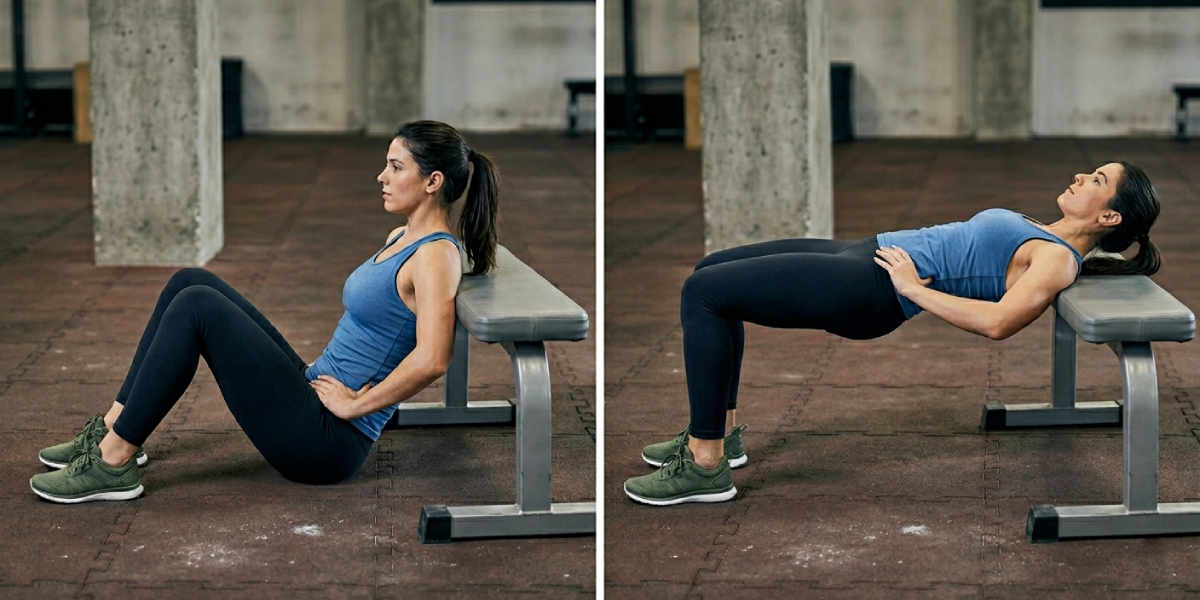
Step 1: Set Up Your Position
Sit on the floor with your upper back resting against the side of a weight bench. The bench should sit just below your shoulder blades. Place your feet flat on the floor, hip-width apart, with your knees bent at roughly 90 degrees. Roll the barbell over your legs and position it directly over your hip bones. Use a barbell pad to cushion the contact point.
Step 2: Brace and Prepare
Before initiating the movement, take a deep breath and brace your core. Tuck your chin slightly toward your chest to maintain a neutral spine. Press your feet firmly into the floor, ensuring your weight is distributed evenly across the full foot — not just the heels.
Step 3: Drive Through the Hips
Push through both feet simultaneously and drive your hips upward toward the ceiling. Focus on squeezing your glutes hard at the top of the movement. Your shins should be roughly vertical at the top, and your thighs should be parallel to the floor or slightly above. Avoid hyperextending your lower back — the movement comes from the hips, not the lumbar spine.
Step 4: Hold the Peak Contraction
At the top of the movement, pause for one to two seconds while maintaining a strong glute squeeze. Your torso, hips, and thighs should form a straight line from shoulders to knees. Your upper back pivots naturally on the bench — this is expected and correct.
Step 5: Lower Under Control
Slowly lower your hips back toward the floor in a controlled manner. Allow your hips to descend until they are just above the ground — do not fully rest between reps if you are working for muscular tension. Reset your breath and brace for the next repetition.
Key Form Cues to Remember
Even experienced lifters benefit from revisiting these cues regularly to keep their technique sharp:
- Drive through the full foot, not just the heels. Heel-only pressure causes the knees to drift forward and reduces glute engagement.
- Keep your chin tucked. Looking up at the ceiling causes lumbar hyperextension and takes tension off the glutes.
- Squeeze at the top. The peak contraction is where maximum glute activation occurs — do not rush through it.
- Keep knees tracking over the toes. Knees that collapse inward indicate weak hip abductors. Using a light resistance band above the knees can cue proper alignment.
- Brace your core throughout. A braced midsection stabilizes the spine and allows you to generate more force through the hips.
Common Mistakes to Avoid When Doing Hip Thrusts
These are the most frequently observed errors that limit results and increase injury risk:
Mistake 1: Hyperextending the Lower Back
This is by far the most common error. When the lower back arches excessively at the top of the movement, it signals that the glutes are not completing the extension — instead, the lumbar spine is doing the work. Focus on tilting your pelvis posteriorly (tucking under) at the top to fully engage the glutes and protect the spine.
Mistake 2: Using Too Much Weight Too Soon
Loading the barbell beyond what your form can support leads to compromised mechanics and increases injury risk. Begin with bodyweight or a very light barbell to groove the movement pattern before adding significant load. Glute strength responds very well to progressive overload, but only when technique remains sound.
Mistake 3: Incorrect Foot Placement
Feet placed too far forward shift the emphasis toward the hamstrings. Feet placed too close to the body reduce range of motion. Experiment with foot position until your shins are vertical at the top of the movement and you feel the burn primarily in your glutes.
Mistake 4: Rushing the Repetitions
Fast, bouncy reps reduce time under tension and limit muscle-building stimulus. Aim for a controlled tempo — approximately two seconds up, a one-second hold at the top, and two seconds down.
Mistake 5: Neglecting the Warm-Up
Hip thrusts place significant load on the hips and lower body. Always warm up with hip circles, glute bridges, and a few bodyweight hip thrust repetitions before loading the barbell. A proper warm-up enhances muscle activation and reduces injury risk significantly.
Hip Thrust Variations to Progressively Challenge Your Glutes
Variety keeps training effective and engaging. These hip thrust variations target the glutes from slightly different angles and difficulty levels:
Bodyweight Hip Thrust
The starting point for beginners. Performed with no external load, this variation helps you develop proper movement mechanics, hip mobility, and glute mind-muscle connection before progressing to loaded variations.
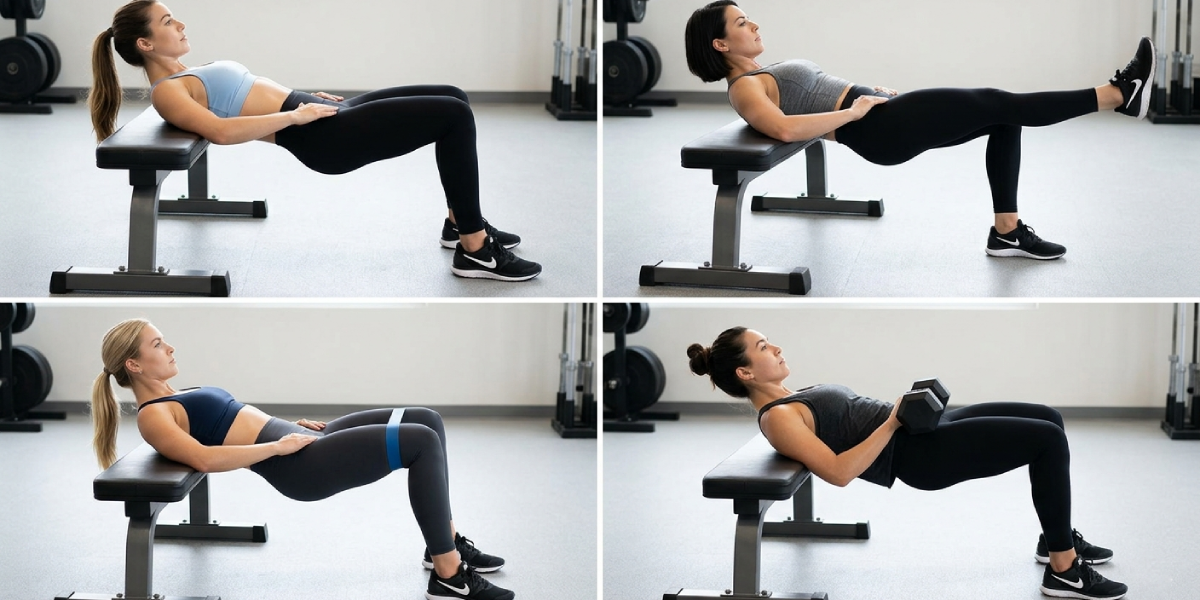
Single-Leg Hip Thrust
Performed with one foot elevated and the opposite leg extended, this unilateral variation increases the challenge significantly, corrects side-to-side imbalances, and improves hip stability. It is an excellent progression between bodyweight and barbell work.
Banded Hip Thrust
Placing a resistance band just above the knees during hip thrusts engages the hip abductors simultaneously, improves knee tracking, and increases glute activation. This is especially useful for people who struggle to feel their glutes working during conventional hip thrusts.
Dumbbell Hip Thrust
A practical alternative to the barbell version, the dumbbell hip thrust is easier to set up and well-suited for home training or when gym equipment is limited. Hold a dumbbell vertically on your hip with both hands.
Elevated Hip Thrust (Feet on Bench)
Placing both feet on a raised surface increases the range of motion through which the glutes are loaded, creating a more intense stimulus. This advanced variation requires excellent hip mobility and hamstring flexibility.
How to Program Hip Thrusts for Maximum Glute Growth
For best results, consider the following programming guidelines based on established strength training principles:
| Goal | Sets | Reps | Rest Period |
|---|---|---|---|
| Muscle size (hypertrophy) | 3 to 4 | 8 to 15 | 60 to 90 seconds |
| Strength | 4 to 5 | 3 to 6 | 2 to 3 minutes |
| Muscular endurance | 2 to 3 | 15 to 25 | 30 to 60 seconds |
| Beginner development | 2 to 3 | 10 to 12 | 60 to 90 seconds |
Most lifters benefit from performing hip thrusts two to three times per week, allowing at least 48 hours of recovery between sessions. Incorporate hip thrusts as a primary movement in your lower body day and pair them with squat or lunge variations for comprehensive glute and leg development.
Hip Thrusts and Overall Health: The Bigger Picture
Building glute strength through hip thrusts delivers benefits that extend well beyond aesthetics. Strong glutes are directly linked to reduced lower back pain, improved posture, better knee stability, and more efficient movement patterns in daily life.
Athletes in virtually every sport — from sprinting and jumping to swimming and cycling — benefit from a stronger posterior chain.
If you are focused on your overall health and physical wellbeing, it is worth considering how your body composition, nutrition, and recovery habits support your training.
Tools like a BMI calculator can provide a useful reference point for tracking your health metrics alongside your fitness progress, though they should always be interpreted in the context of your overall health and fitness level, not as a standalone measure.
Consistency, progressive overload, and adequate protein intake are the foundational pillars that will determine how effectively hip thrusts translate into real glute strength and muscle growth over time.
Frequently Asked Questions
Are hip thrusts better than squats for building glutes?
Hip thrusts and squats complement each other rather than compete. Research shows hip thrusts produce greater peak glute activation because they load the glutes at full contraction. Squats, on the other hand, develop the glutes through a longer range of motion under significant mechanical load. For the best glute development, include both movements in your program.
How much weight should a beginner use for hip thrusts?
Beginners should start with bodyweight only and progress to a lightly loaded barbell (around 20 to 40 pounds) once they have mastered the movement pattern. There is no benefit to loading heavily until your technique is consistent and controlled. Add weight in small increments of 5 to 10 pounds per session as you grow stronger.
How often should I do hip thrusts per week?
Two to three times per week is the sweet spot for most people. This frequency provides enough stimulus for muscle growth while allowing adequate recovery between sessions. If you are doing intense glute-focused sessions, 48 hours of rest between workouts is recommended.
Do hip thrusts work the hamstrings or lower back?
Hip thrusts primarily target the gluteus maximus, with secondary involvement from the hamstrings and hip adductors. When performed with correct form — avoiding lumbar hyperextension — they place minimal stress on the lower back. The spine should remain neutral throughout the movement, with all the work coming from the hips.
Can I do hip thrusts if I have lower back pain?
In many cases, hip thrusts can actually help alleviate lower back pain by strengthening the glutes, which reduces compensatory strain on the lumbar spine. However, if you have an existing back injury or acute pain, consult with a healthcare professional or qualified physiotherapist before adding loaded hip thrusts to your routine. Bodyweight variations are generally safer to begin with.
Why can’t I feel my glutes during hip thrusts?
Difficulty feeling the glutes during hip thrusts is very common and usually comes down to one of these factors: feet placed too far forward, knees not tracking over the toes, rushing through repetitions, or insufficient mind-muscle connection. Try slowing down, adding a longer pause at the top, using a resistance band above the knees, and practicing glute activation drills such as clamshells or donkey kicks before your hip thrust sets.
What is the difference between a glute bridge and a hip thrust?
A glute bridge is performed lying flat on the floor with no bench support, while a hip thrust uses a bench to elevate the upper back, allowing a greater range of hip extension. The hip thrust creates a larger range of motion and typically allows for significantly more loading, making it the superior choice for developing maximal glute strength and size over time. Glute bridges are an excellent introductory exercise.
Should I feel hip thrusts in my quads or knees?
Properly performed hip thrusts should not produce significant quad or knee discomfort. If your quads are dominating the movement, your feet may be too close to your body. If you feel discomfort in the knees, check that your shins are vertical at the top and that you are not letting the knees travel excessively forward. Adjusting foot placement by a few inches in either direction can make a dramatic difference in muscle targeting.