


If you want to know how to do pull-ups with proper form and get real, lasting results, you are in the right place. The pull-up is one of the most effective bodyweight exercises ever developed, and mastering it will transform your back, arms, and core.
This comprehensive guide walks you through everything from your first attempt to advanced variations, so you can build serious upper body strength safely and efficiently.
What Are Pull-Ups and Why They Matter for Upper Body Strength
A pull-up is a compound, closed-chain upper body exercise where you hang from a bar with an overhand grip and pull your entire bodyweight upward until your chin clears the bar. Because you are moving your own body through space, it recruits multiple muscle groups simultaneously, making it one of the most efficient strength exercises available without equipment.
Unlike isolation machines that target a single muscle, the pull-up forces your muscles to coordinate as a unit. This functional strength carries over into sports performance, daily activities, and overall physical resilience. Whether you are a beginner trying your first rep or an experienced athlete adding volume, the pull-up belongs in your training plan.
Incorporating pull-ups into your regular exercise routine consistently produces measurable gains in back width, grip strength, shoulder stability, and arm definition. Few movements deliver that return on time invested.
Muscles Worked During Pull-Ups

Understanding which muscles fire during a pull-up helps you train smarter and troubleshoot weaknesses more effectively.
- Latissimus dorsi — The large, wing-shaped back muscles that drive the majority of the pulling movement and give your back its V-taper appearance.
- Biceps brachii — The front of the upper arm assists in elbow flexion throughout the lift.
- Teres major and minor — Smaller muscles alongside the lats that contribute to shoulder extension and internal rotation.
- Rhomboids and middle trapezius — These muscles retract the scapulae and keep the shoulder blades stable at the top of the movement.
- Posterior deltoid — The rear portion of the shoulder stabilizes and assists the pulling motion.
- Brachialis and brachioradialis — Deep arm muscles that support elbow flexion alongside the biceps.
- Core musculature — The abs, obliques, and spinal erectors brace the entire body to prevent swinging and maintain rigid alignment.
How to Do Pull-Ups with Proper Form: Step-by-Step
Proper technique is non-negotiable. Sloppy pull-ups not only reduce effectiveness but increase injury risk at the shoulders, elbows, and neck. Follow this step-by-step breakdown every time you approach the bar.
Step 1 — Set Up Your Grip
Grab a sturdy overhead bar with an overhand grip, meaning your palms face away from you. Hands should be placed slightly wider than shoulder-width apart. A grip that is too narrow over-emphasizes the biceps and reduces lat engagement.
A grip that is too wide places excessive strain on the shoulders. Wrap all four fingers and your thumb fully around the bar so your grip is secure from the start.
Step 2 — Start from a Dead Hang
Let your arms fully extend and allow your shoulders to relax and elevate naturally. Your feet should clear the floor. This starting position is called a dead hang, and it matters because beginning from a fully extended position ensures you move through the complete range of motion, which is essential for muscle development and joint health.
Step 3 — Activate Your Shoulder Blades
Before you pull, depress and retract your shoulder blades. Think about pulling them down and back, away from your ears. This simple cue pre-activates the lats, stabilizes the shoulder joint, and sets the correct movement pattern before any arm bending occurs. Skipping this step is the most common technical error in pull-up performance.
Step 4 — Pull Your Elbows Down and Back
Initiate the pull by driving your elbows toward the floor and behind your body, rather than thinking about lifting your hands. This mental cue keeps the focus on your back rather than your arms and prevents the biceps from dominating the lift. Breathe out as you pull upward.
Step 5 — Rise Until Your Chin Clears the Bar
Continue pulling until your chin rises above the level of the bar. Keep your chest tall and slightly forward-facing, not rounded. Avoid the temptation to crane your neck upward to fake chin clearance. The chest should come close to the bar on each rep if your range of motion is good.
Step 6 — Lower Slowly and Under Control
The descent, known as the eccentric phase, is where a large portion of strength gains occur. Lower yourself back to the dead hang over two to three seconds, resisting gravity the entire way. Do not drop suddenly. Controlled lowering builds more muscle than fast, uncontrolled reps and protects the joints.
Step 7 — Reset and Repeat
At the bottom, briefly pause in the dead hang to reset shoulder position before beginning the next repetition. This pause prevents momentum-driven reps and ensures each pull is independent and full-range.
Common Pull-Up Mistakes to Avoid
Even experienced gym-goers fall into these technique traps. Identifying and correcting them will immediately improve both your performance and your safety.
| Mistake | Why It Happens | How to Fix It |
|---|---|---|
| Shrugging the shoulders at the start | Lack of scapular awareness | Practice dead hangs with scapular depression before pulling |
| Kipping or swinging the hips | Using momentum to compensate for lack of strength | Build strength with negatives and band-assisted pull-ups first |
| Partial range of motion | Ego-driven rep counting | Reduce reps and prioritize full extension and chin clearance |
| Craning the neck upward | Trying to reach chin-over-bar height | Maintain neutral spine, let the lift come from back strength |
| Fast, uncontrolled lowering | Fatigue or habit | Count three seconds on every descent deliberately |
| Gripping too wide | Misconception that wider means better lat engagement | Use a slightly wider than shoulder-width grip only |
Pull-Up Variations to Build Upper Body Strength
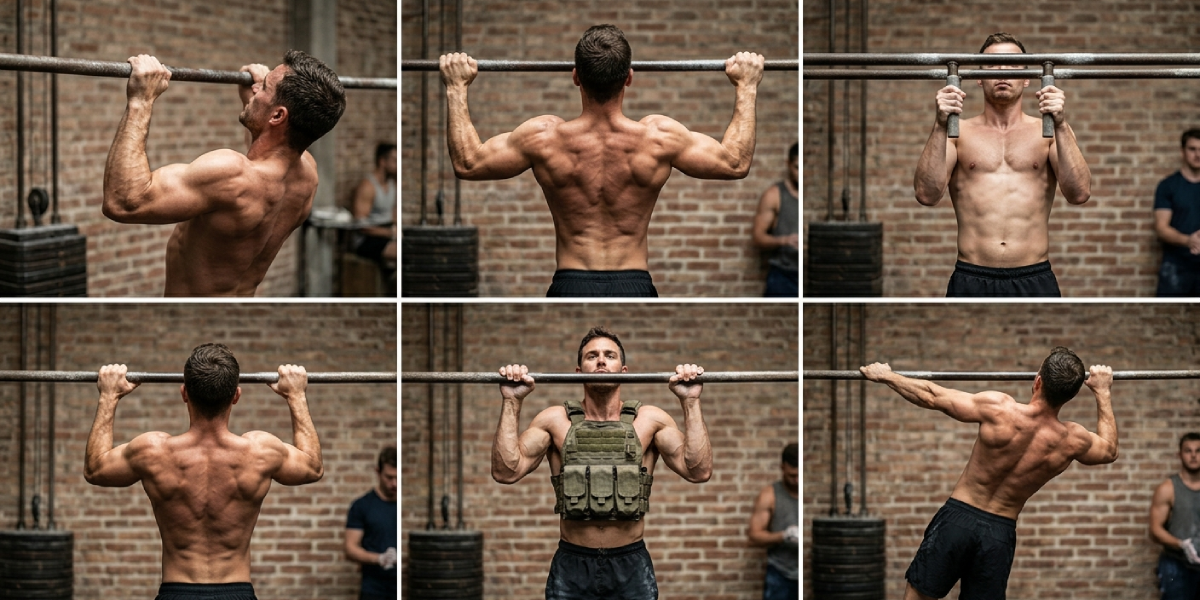
Once you have the standard pull-up down, adding variations keeps your training fresh and develops strength across different angles and movement patterns.
Chin-Up
Using an underhand, supinated grip with hands shoulder-width apart, the chin-up shifts more emphasis to the biceps while still heavily engaging the lats. Many beginners find chin-ups slightly easier than traditional pull-ups and use them as a stepping stone to build pulling strength.
Wide-Grip Pull-Up
Placing hands wider than shoulder-width increases the demand on the outer lats and is often used to build back width. The range of motion is somewhat reduced, so maintain strict form and ensure full chin clearance on each rep.
Neutral-Grip Pull-Up
Using parallel handles with palms facing each other is the most shoulder-friendly variation and places even stress across the lats, biceps, and brachialis. This grip is excellent for individuals with any history of shoulder discomfort.
Commando Pull-Up
Gripping the bar with one hand in front of the other, thumbs pointing toward each other, and alternating which side you pull toward on each rep. This variation challenges both lateral and rotational stability in the trunk and back.
Weighted Pull-Up
Once bodyweight pull-ups are manageable for sets of eight or more, adding external load via a dip belt, weight vest, or dumbbell held between the ankles drives continued strength and hypertrophy adaptation.
Archer Pull-Up
An advanced variation where you reach one arm straight out while pulling up on the opposite side. This movement increases unilateral demand and is a strong preparation for the one-arm pull-up.
How to Do Pull-Ups as a Beginner: Building Up from Zero
Not being able to complete a full pull-up is entirely normal. The body needs to develop specific pulling strength that most people have not trained before. These proven progressions get you there methodically.
Scapular Pull-Ups
Start by hanging from the bar and simply depressing and retracting your shoulder blades without bending the elbows. This teaches the foundational movement pattern and strengthens the muscles responsible for initiating the pull before any elbow flexion occurs.
Band-Assisted Pull-Ups
Loop a resistance band around the bar and place your knees or feet in the loop. The band offloads a portion of your bodyweight, allowing you to practice full-range pull-ups with correct form. As you get stronger, use progressively lighter bands.
Negative Pull-Ups (Eccentric Only)
Jump or step up so your chin starts above the bar, then lower yourself as slowly as possible back to a dead hang. Aim for five to ten seconds on each descent. Eccentric training builds strength rapidly and is scientifically well-supported for developing the pulling muscles needed for full pull-ups.
Australian Pull-Up (Inverted Row)
Set a bar at hip height, lie underneath it, and pull your chest to the bar with your heels on the floor. This horizontal rowing movement trains the same muscles as a vertical pull-up but at a reduced loading percentage of your bodyweight, making it accessible regardless of current strength level.
Structuring Your Pull-Up Training Program
Consistent, progressive training is the only reliable path to pull-up strength. Random workouts without structure produce slow and frustrating results. Here is a sensible framework based on your current ability level.
Beginner: 0 to 5 Pull-Ups
Train pull-up progressions three times per week with at least one rest day between sessions. Perform three to four sets of band-assisted pull-ups or negatives, focusing entirely on form rather than rep counts. Add one or two reps per session when the current load feels controllable.
Intermediate: 5 to 15 Pull-Ups
Work on accumulating total volume. Grease the groove training, where you perform multiple sets throughout the day at half your maximum rep count, is highly effective. For example, if your max is eight reps, perform sets of four spread across the day, several times weekly.
Advanced: 15-Plus Pull-Ups
Progress to weighted pull-ups, add advanced variations, or incorporate pull-up ladders and density sets. At this stage, periodization becomes important: cycle through phases of higher volume, higher intensity, and active deloading to continue progressing without accumulated fatigue.
Nutrition and Recovery to Support Pull-Up Strength Gains
Training is the stimulus. Nutrition and recovery are where adaptation actually takes place. Paying attention to both accelerates your progress considerably.
Adequate protein intake is essential for muscle repair and growth. Aim for 1.6 to 2.2 grams of protein per kilogram of bodyweight daily. Distributed across three to four meals, this supports continuous muscle protein synthesis between sessions.
Quality carbohydrates provide the energy needed to train at high effort, and healthy fats support hormonal function including the testosterone that underpins strength development.
Sleep is where the body repairs muscle tissue damaged during training. Seven to nine hours of quality sleep per night is not a luxury for serious trainees — it is a biological requirement for adaptation. Chronic sleep deprivation measurably reduces strength performance and slows muscle growth regardless of training quality.
Monitoring your overall health and wellness beyond just training sessions — including stress management, hydration, and recovery practices — makes a real difference in how quickly you progress and how resilient you remain against injury over time.
If you are interested in tracking your body composition progress alongside your strength gains, using a reliable BMI calculator can offer a useful reference point as part of your broader fitness monitoring.
Safety Considerations for Pull-Up Training
Pull-ups are generally safe when performed correctly, but a few precautions help you train long-term without setbacks.
Always warm up the shoulder joint before training. Arm circles, band pull-aparts, and thoracic spine mobility drills prime the joints for the demands ahead. Never skip directly into heavy working sets from a cold state.
Pay attention to elbow health. Medial epicondylalgia, commonly called golfer’s elbow, can develop from excessive pulling volume without adequate rest. If you feel persistent medial elbow pain, reduce volume immediately and address it early rather than training through it.
Grip strength often fatigues before the back does for beginners, which can cause you to release the bar unexpectedly. Use chalk or lifting straps if needed during heavier weighted variations. Building raw grip strength through dead hangs and farmer carries supplements your pull-up progress as well.
Frequently Asked Questions
How many pull-ups should a beginner be able to do?
Beginners should not worry about a specific number. The goal is to build the strength to complete one full pull-up with correct form. Most people reach their first unassisted pull-up within four to eight weeks of consistent progression work using bands, negatives, and inverted rows.
What is the difference between a pull-up and a chin-up?
A pull-up uses an overhand, pronated grip with palms facing away from you, emphasizing the lats more heavily. A chin-up uses an underhand, supinated grip with palms facing toward you, placing more demand on the biceps while still engaging the back significantly. Both are excellent exercises worth including in your training.
How often should I train pull-ups per week?
Most people train pull-ups two to four times per week depending on volume and intensity. Beginners typically do well with three sessions per week using lower volume, while intermediate and advanced trainees can handle more frequency by managing set counts carefully and including deload weeks periodically.
Can pull-ups build a big back?
Yes. Pull-ups are among the most effective movements for developing back width, specifically the latissimus dorsi. Consistent pull-up training with progressive overload, combined with adequate protein intake, produces significant back muscle development over months of training.
Are pull-ups bad for your shoulders?
Pull-ups performed with correct form, proper warm-up, and appropriate training volume are not bad for healthy shoulders. In fact, they strengthen the rotator cuff and improve shoulder stability. Problems typically arise from poor technique, such as failing to depress the scapulae, excessive volume without recovery, or pre-existing shoulder pathology that requires medical guidance.
Do pull-ups work the biceps?
Yes, the biceps brachii are an active contributor to the pull-up, particularly during elbow flexion in the upper portion of the movement. Chin-ups place even more emphasis on the biceps due to the supinated grip. Pull-up training therefore provides indirect but meaningful biceps development alongside its primary back-building effects.
What can I do if I cannot do a single pull-up yet?
Start with the progressions outlined in the beginner section: scapular pull-ups, band-assisted pull-ups, negative pull-ups, and inverted rows. These exercises develop the exact muscles and movement patterns needed for a full pull-up and are the most direct path from zero to your first complete rep.
Is it better to do pull-ups every day?
For most people, daily pull-up training with full working sets is too much volume without adequate recovery and increases the risk of overuse injury. However, low-volume daily practice such as one or two easy sets per day can be effective for skill development in beginners. More advanced practitioners sometimes use daily training with very carefully managed volume and intensity.
How long does it take to get good at pull-ups?
Most dedicated beginners reach their first full pull-up within four to eight weeks of consistent progressive training. Achieving sets of eight or more clean reps typically takes three to six months. Progression speed depends on starting strength, training consistency, nutrition, sleep quality, and bodyweight relative to pulling strength.
What grip width is best for pull-ups?
A grip slightly wider than shoulder-width is optimal for most people. This width allows effective lat engagement through a full range of motion while keeping shoulder stress at a manageable level. Very wide grips reduce range of motion and increase lateral shoulder strain, while very narrow grips shift too much work onto the arms.