
The inchworm exercise is one of the most effective full-body movements you can add to your fitness routine. Whether you are warming up before a workout or looking for a standalone mobility drill, this deceptively simple exercise stretches and strengthens your entire body from head to toe.
In this guide, you will learn exactly how to perform it, which muscles it targets, why it belongs in your routine, and how to modify it to match your current fitness level.
What Is the Inchworm Exercise?
The inchworm is a dynamic bodyweight movement that combines a forward fold, a plank hold, and a hip hinge into one flowing sequence. It mimics the way an inchworm moves across a surface, which is exactly where the name comes from.
Unlike static stretches that hold one position, the inchworm moves through a full range of motion, making it a dynamic flexibility drill that also builds functional strength.
It requires no equipment and very little space, which makes it accessible for home workouts, gym warm-ups, office movement breaks, or outdoor sessions.
Fitness professionals and physical therapists frequently recommend it because it addresses multiple movement patterns simultaneously: spinal flexion, shoulder stabilization, hamstring lengthening, and core activation.
Muscles Worked During the Inchworm Exercise
One reason the inchworm exercise has earned its place among trainers and coaches is its ability to engage a wide range of muscles in a single repetition. Here is a breakdown of the primary and secondary muscles involved:
| Muscle Group | Role During the Movement |
|---|---|
| Hamstrings | Stretched during the forward fold and walk-out phase |
| Hip flexors | Lengthened as you walk hands forward into plank |
| Core (abs, obliques) | Stabilize the spine throughout the entire movement |
| Shoulders and chest | Activated in the plank position |
| Glutes | Engaged during the return walk and hip extension |
| Calves | Stretched when heels press toward the floor in the fold |
| Lower back | Mobilized through the full range of spinal movement |
This comprehensive muscle engagement is one of the main reasons the inchworm is a staple in many exercise programs ranging from beginner routines to advanced athletic training.
Step-by-Step Instructions for the Inchworm Exercise
Performing the inchworm correctly is important for getting the full benefit while avoiding strain. Follow these steps carefully, especially if you are new to the movement.
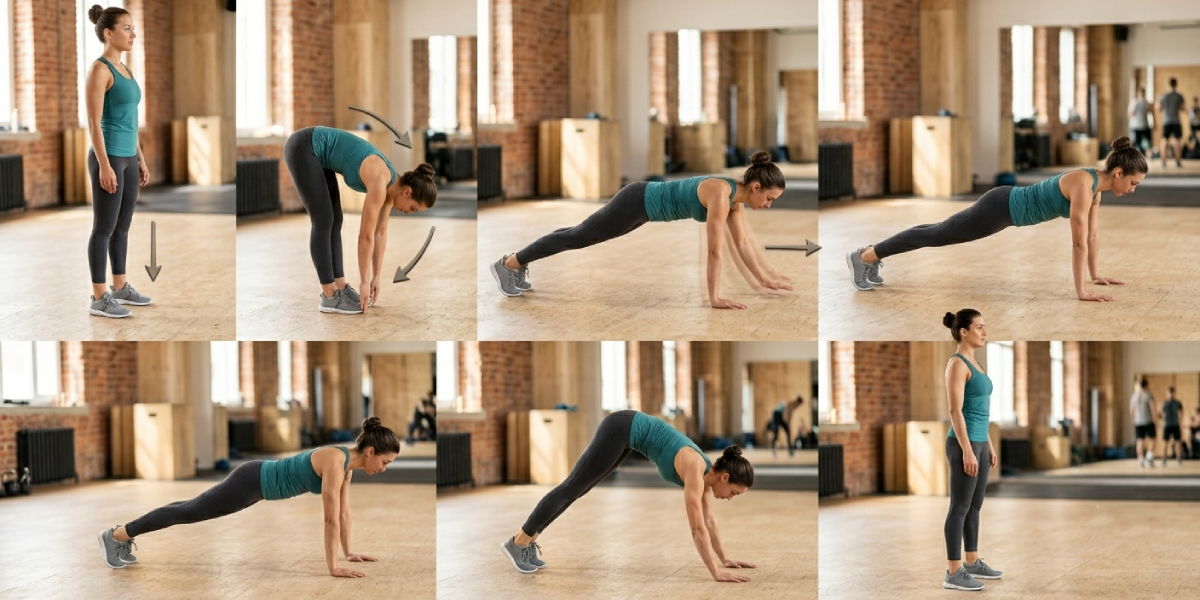
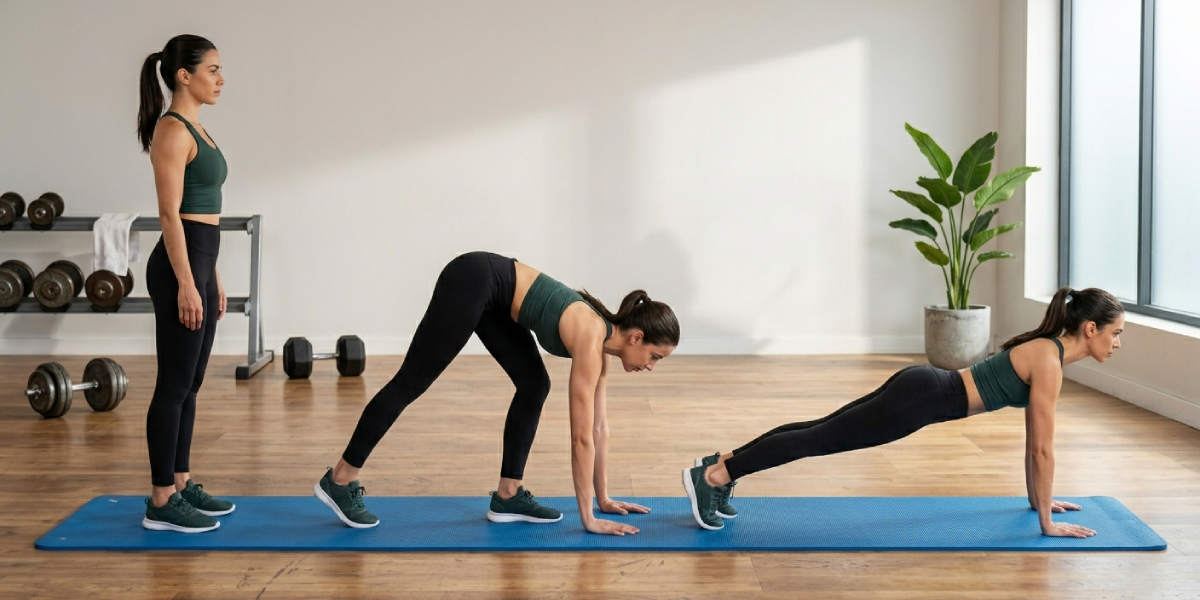
Starting Position
Stand tall with your feet hip-width apart and your arms resting at your sides. Engage your core lightly and take a breath to prepare. Keep a soft bend in your knees if your hamstrings are tight, which is a perfectly acceptable modification when starting out.
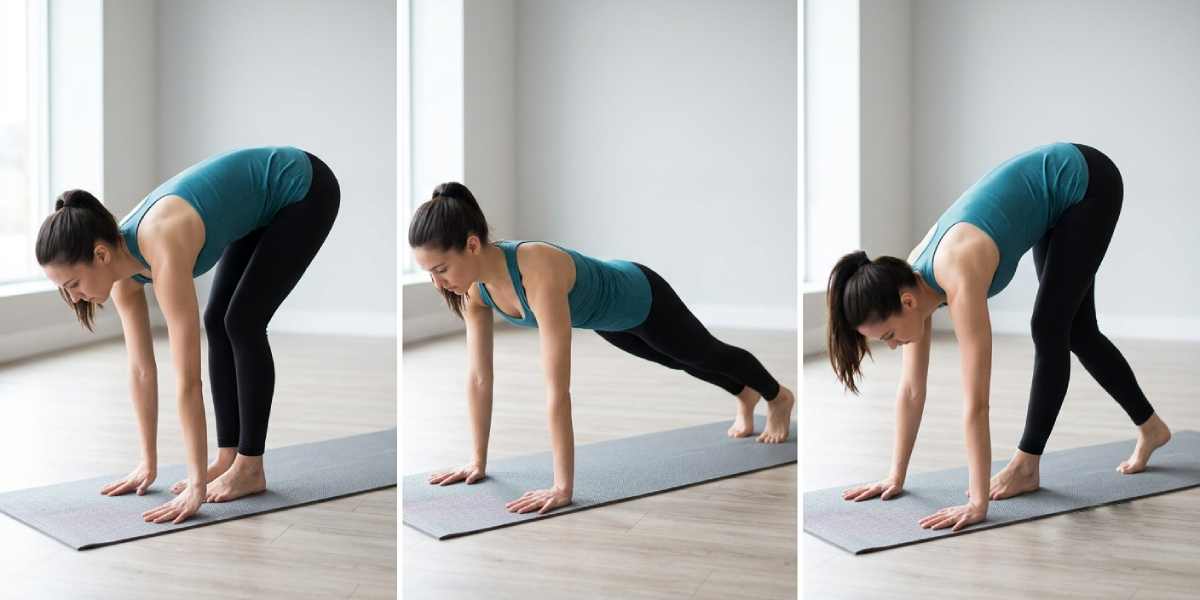
The Forward Fold
Hinge at your hips and slowly lower your hands toward the floor. Keep your legs as straight as your flexibility allows. Your goal is to place both palms flat on the floor directly in front of your feet. If you cannot reach the floor yet, bend your knees more until your hands make contact. Do not round your neck or strain to force the position.
Walking Your Hands Forward
With your palms flat on the floor, begin walking your hands forward one at a time. Take small, controlled steps with each hand. Continue walking forward until you arrive in a high plank position, which means your body forms a straight line from your head to your heels. Your hands should be directly beneath your shoulders, wrists aligned under the joints.
The Plank Hold
Pause briefly in the plank position. This is not just a passing-through phase. Use this moment to actively engage your core, squeeze your glutes lightly, and keep your hips level. Avoid letting your lower back sag or your hips pike upward. This brief hold builds the shoulder and core strength that makes the inchworm so effective over time.
Walking Your Feet Forward
Now reverse the motion. Keep your hands planted and begin walking your feet toward your hands using small steps. Walk your feet in until they are close to or between your hands, returning to the forward fold position. Again, your heels do not need to be flat on the floor if your flexibility does not allow it yet.
Standing Back Up
From the folded position, slowly roll your spine upward one vertebra at a time until you are standing tall again. This controlled return is part of the movement and helps mobilize the spine. That completes one full repetition.
How Many Reps and Sets Should You Do?
For a warm-up, four to six inchworm repetitions are typically enough to elevate your core temperature and prime your joints for more intense activity. If you are using the inchworm as part of a dedicated mobility session or cool-down, you can extend it to two or three sets of eight to ten reps with slow, controlled movement.
Because the inchworm is a low-impact, bodyweight movement, there is no single universal rep recommendation. The most important factor is quality over quantity. Each repetition should be deliberate, with proper form throughout. Rushing through the movement reduces the stretch and activation benefits significantly.
Common Mistakes to Avoid
Even a seemingly simple exercise like the inchworm can be performed incorrectly in ways that reduce effectiveness or cause discomfort. Knowing what to watch out for helps you get the most from every rep.
- Letting the hips sag in plank: This places strain on the lower back. Keep your core engaged and your body in a straight line.
- Moving too quickly: Rushing through the exercise eliminates the stretch component. Move slowly and with intention.
- Bending the elbows during hand walking: Keep your arms straight as you walk your hands forward to maintain proper shoulder positioning.
- Jerking the head up or down: Your neck should remain neutral throughout. Keep your gaze just slightly ahead of your hands in plank.
- Skipping the plank hold: Even a one-second pause in plank adds significant core and shoulder benefits over time.
- Forcing range of motion: If your hamstrings are tight, bending your knees slightly is not a failure. It is smart training that prevents injury.
Inchworm Exercise Variations
Once you are comfortable with the standard inchworm, several variations can increase the challenge or shift the focus to different muscle groups.
Inchworm with Push-Up
At the top of the plank position, perform one push-up before walking your feet back in. This adds a chest, shoulder, and triceps strengthening component to the movement, turning it from a pure flexibility drill into a hybrid strength-and-mobility exercise.
Inchworm with Shoulder Tap
In the plank position, tap your right hand to your left shoulder, then your left hand to your right shoulder before continuing. This variation challenges anti-rotational core stability and builds proprioceptive balance.
Lateral Inchworm
Instead of moving forward in a straight line, move laterally by stepping your hands sideways across the floor. This version engages the lateral hip muscles and adds an extra challenge to shoulder stability.
Inchworm to Downward Dog
After reaching the plank position, push your hips upward into a downward-facing dog pose and hold for two to three breaths before returning to plank and walking your feet in. This yoga-inspired variation deepens the hamstring and calf stretch considerably.
When and How to Include the Inchworm in Your Routine
The inchworm fits naturally into several phases of a workout or movement practice. As a warm-up drill, it increases blood flow, raises body temperature, and improves range of motion before more demanding training. As a cool-down movement, it helps restore flexibility and reduce post-exercise tightness, particularly in the hamstrings and hip flexors.
For those interested in long-term health and wellness, consistent mobility work like the inchworm pays off over years. Improved flexibility and joint mobility are strongly associated with reduced injury risk, better posture, and easier daily movement as we age. Even five minutes of deliberate mobility work several times per week can yield meaningful improvements over a few months.
The inchworm also complements strength training, running, cycling, yoga, and team sports. Because it requires no equipment, it can be performed anywhere and is an excellent option for travel workouts or minimal-space home sessions.
Who Can Do the Inchworm Exercise?
The inchworm is appropriate for most fitness levels, from complete beginners to advanced athletes. Its intensity is easily self-regulated by slowing down the pace, bending the knees more during the fold, or adding difficulty through the variations described above.
People with certain conditions such as acute lower back pain, wrist injuries, or shoulder impingement should consult a healthcare professional before attempting this movement. That said, many physical therapists use modified versions of the inchworm as part of rehabilitation protocols precisely because of its gentle spinal mobilization benefits.
If you are uncertain about your current fitness baseline, using a BMI calculator alongside a conversation with your doctor or trainer can help you set realistic starting points for exercises like the inchworm and build from there safely.
Benefits of the Inchworm Exercise
The inchworm offers a uniquely broad set of benefits relative to the simplicity of the movement. Here is why so many fitness professionals return to it again and again:
- Improves hamstring and hip flexor flexibility through active stretching rather than passive holds
- Builds shoulder stability and core strength during the plank phase
- Mobilizes the thoracic and lumbar spine through controlled flexion and extension
- Requires zero equipment and minimal space, making it highly accessible
- Functions as both a warm-up and a cool-down depending on pace and intent
- Scales easily from beginner-friendly to advanced with simple add-ons
- Improves posture over time by addressing common tightness patterns in desk workers and sedentary individuals
Frequently Asked Questions
What does the inchworm exercise primarily do for the body?
The inchworm exercise simultaneously stretches the hamstrings, hip flexors, and calves while activating the core, shoulders, and glutes. It improves dynamic flexibility, spinal mobility, and functional strength through a single continuous movement pattern.
Is the inchworm exercise good for beginners?
Yes. The inchworm is suitable for beginners because the intensity is easy to self-regulate. Beginners can bend their knees more during the fold to reduce hamstring strain and move slowly to build comfort with the movement before progressing.
How many calories does the inchworm exercise burn?
The inchworm burns a moderate number of calories relative to its effort level. As a low-to-moderate intensity bodyweight movement, it is not designed primarily for calorie burning. It is most valuable as a mobility and strength primer. That said, incorporating it into longer circuits increases overall energy expenditure.
Can the inchworm exercise help with lower back pain?
For many people, yes. The inchworm gently mobilizes the lumbar and thoracic spine, which can relieve tension from prolonged sitting. However, anyone with acute or chronic lower back conditions should consult a healthcare professional before adding it to their routine, as individual circumstances vary.
How often should I do the inchworm exercise?
Most people benefit from performing the inchworm three to five times per week, either as part of a warm-up or as a standalone mobility drill. Daily performance is also safe for most healthy individuals since the movement is low-impact and does not cause significant muscular fatigue.
Is the inchworm exercise the same as a walkout?
The inchworm and the walkout are very similar and are often used interchangeably. The main distinction is that the walkout typically focuses on the plank walk and return without the deliberate vertical roll-up, while the inchworm emphasizes the full spinal unrolling from bottom to standing position as part of the movement.
What are the best inchworm exercise variations for advanced athletes?
Advanced athletes can try the inchworm with a push-up, the shoulder-tap inchworm, the lateral inchworm, or the inchworm to downward dog. Adding a slow tempo, a longer plank pause, or combining two variations in a single rep further increases the challenge significantly.
Does the inchworm exercise improve posture?
Over time, regular inchworm practice can contribute to improved posture by lengthening the hamstrings and hip flexors, which often become tight from prolonged sitting. This tightness is a common contributor to anterior pelvic tilt and the forward-leaning posture many desk workers develop. Addressing it through consistent dynamic stretching like the inchworm supports better spinal alignment.
What is the proper breathing pattern during the inchworm exercise?
A reliable breathing pattern is to exhale as you fold forward and walk your hands out to plank, and inhale during the brief plank hold. Exhale again as you walk your feet in, and inhale as you roll back up to standing. Matching breath to movement enhances body awareness and keeps the core gently engaged throughout.
Can I do the inchworm exercise on hard floors or do I need a mat?
You can perform the inchworm on most surfaces, but a yoga mat or exercise mat is recommended for comfort, especially if you have sensitive wrists or are working on hardwood or concrete. A mat also provides a slight grip advantage that helps during the plank phase and when walking your hands across the floor.