

The RDL exercise, short for Romanian Deadlift, is one of the most effective posterior chain movements you can add to your training routine. Whether you are a beginner learning the basics or an experienced lifter refining your technique, understanding how to perform the RDL with proper form will make a significant difference in your hamstring strength, muscle development, and injury resilience.
In this complete guide, you will learn the exact steps to perform the RDL exercise correctly, the muscles it targets, the most common mistakes to avoid, and practical variations to keep your training progressive and effective.
What Is the RDL Exercise?
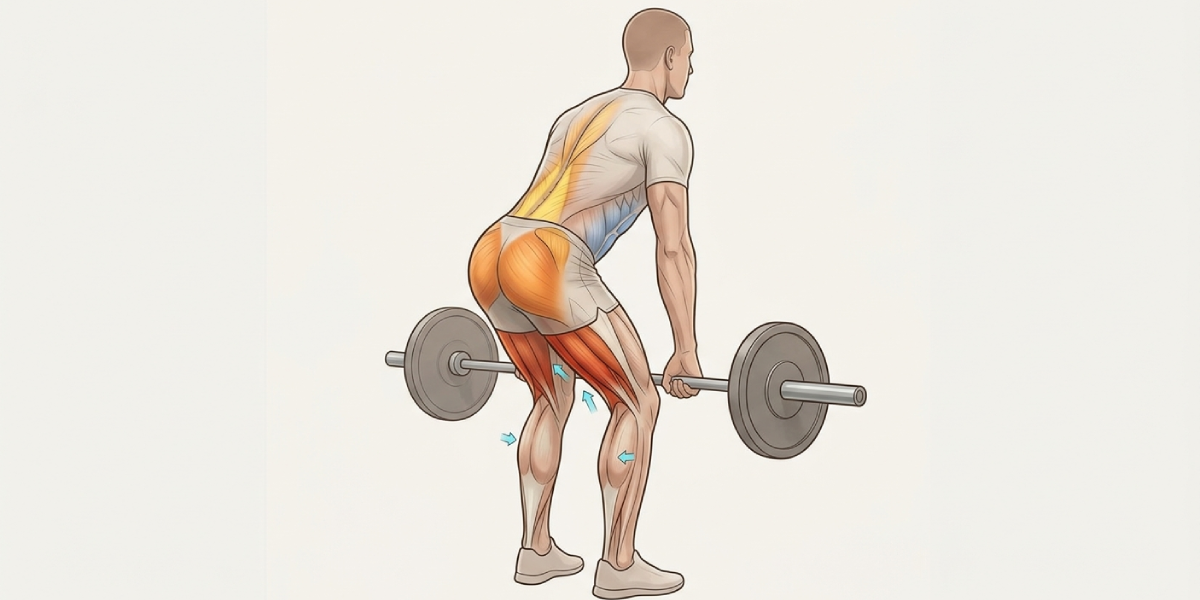
The Romanian Deadlift is a hip-hinge movement that primarily targets the hamstrings and glutes while also engaging the lower back, core, and calves as stabilizers. Unlike a conventional deadlift, the RDL keeps a slight bend in the knees throughout the entire movement. ‘
The bar or weight never touches the floor between repetitions, which maintains constant tension on the posterior chain muscles.
This exercise takes its name from Romanian Olympic weightlifters who used it as an accessory movement to build posterior strength for the clean and snatch. It has since become a staple in strength training, bodybuilding, athletic conditioning, and general exercise programming worldwide.
Muscles Worked During the RDL
Understanding the muscles involved helps you train with intention and get more out of every set.
- Hamstrings: The primary movers. All three hamstring muscles — the biceps femoris, semitendinosus, and semimembranosus — are stretched and loaded under tension during the descent phase.
- Gluteus Maximus: The glutes work powerfully during hip extension to drive you back to the starting position.
- Erector Spinae: The lower back muscles work isometrically to keep the spine in a neutral position throughout the movement.
- Core Muscles: The transverse abdominis and obliques stabilize the trunk and protect the lumbar spine.
- Calves and Adductors: These muscles assist in balance and lower-body stability.
Equipment You Need to Get Started
One of the best things about the RDL exercise is its versatility. You can perform it using:
- A barbell and weight plates (most common)
- Dumbbells (great for beginners or unilateral work)
- Kettlebells
- A trap bar or hex bar
- Resistance bands for lighter, joint-friendly loading
For beginners, starting with dumbbells allows you to focus on form before adding heavier barbell loads. As your technique improves, progressing to a barbell enables greater overload and long-term strength gains.
How to Do the RDL Exercise: Step-by-Step Form Guide
Proper technique is the foundation of effective and safe training. Follow these steps carefully every time you perform the RDL exercise.
Step 1: Set Up Your Starting Position
Stand with your feet hip-width apart. Hold the barbell or dumbbells in front of your thighs using an overhand grip, with your hands just outside your legs. Your shoulders should be pulled back and down, and your chest should be tall.
Before you move, take a deep breath and brace your core as if you are about to absorb a punch to the stomach. This intra-abdominal pressure protects your spine throughout the movement.
Step 2: Initiate the Hip Hinge
Push your hips back behind you — not down. This is the key distinction between an RDL and a squat. Imagine you are trying to touch a wall that is two feet behind you with your hips. As your hips travel backward, your torso will naturally lower toward the floor. Keep the weight close to your body, dragging it down your shins if using a barbell.
Step 3: Lower the Weight Under Control
Continue lowering the weight while maintaining a neutral spine — no rounding in the lower back and no excessive arching. Keep a soft, unlocked bend in your knees throughout. Lower until you feel a strong stretch in your hamstrings, typically when the bar reaches mid-shin to just below the knee.
The range of motion will vary depending on your hamstring flexibility, and that is perfectly fine.
Step 4: Drive the Hips Forward to Stand
To return to the starting position, squeeze your glutes and push your hips forward. Think about driving the floor away from you through your heels while pulling your hips through to full extension. Do not hyperextend your lower back at the top — simply stand tall with your glutes contracted. Exhale at the top of the movement.
Step 5: Maintain Control Throughout Every Rep
Each repetition should be deliberate and controlled. A tempo of about two seconds down and one second up is a good starting point. Rushing through reps reduces muscle activation and increases injury risk. Performing the RDL exercise with quality movement is always more valuable than moving heavy weight with poor form.
Common Mistakes to Avoid
Even experienced lifters fall into these errors. Being aware of them will accelerate your progress and protect you from injury.
Rounding the Lower Back
This is the most dangerous mistake in the RDL. Rounding occurs when lifters go too heavy, lack core stability, or have limited hamstring flexibility. If your back rounds, reduce the weight, limit your range of motion, and practice bracing your core before each rep.
Bending the Knees Too Much
Excessive knee bend turns the RDL into a conventional deadlift. The RDL is a hip-dominant movement. While the knees remain slightly bent, they should not drop significantly as you descend. Keep the shins as vertical as possible.
Letting the Bar Drift Away from the Body
When the barbell drifts forward, it places excessive strain on the lower back and reduces hamstring activation. Keep the weight as close to your body as possible on every rep.
Using Momentum
Bouncing at the bottom or using a jerking motion on the way up bypasses the eccentric loading that makes the RDL so effective for building hamstring strength. Slow down and own every inch of the movement.
Neglecting Core Bracing
Your core acts as the bridge between your upper and lower body. Failing to brace before each rep places unnecessary stress on your lumbar spine. Practice diaphragmatic breathing and core engagement before the movement begins.
How to Program the RDL Exercise in Your Routine
The RDL is highly versatile and fits well into a variety of training programs. Here are practical programming guidelines based on your goals:
| Goal | Sets | Reps | Rest Period |
|---|---|---|---|
| Strength | 3 to 5 | 3 to 6 | 2 to 3 minutes |
| Muscle Hypertrophy | 3 to 4 | 8 to 12 | 60 to 90 seconds |
| Endurance and Conditioning | 2 to 3 | 15 to 20 | 45 to 60 seconds |
| Athletic Performance | 3 to 4 | 5 to 8 | 90 seconds to 2 minutes |
For most people, performing the RDL exercise two times per week with adequate recovery between sessions is sufficient to drive consistent progress. Pairing it with exercises like leg curls, hip thrusts, and Romanian split squats creates a well-rounded posterior chain training block.
RDL Variations to Advance Your Training
Once you have mastered the basic barbell or dumbbell RDL, these variations provide new challenges and address different training needs.
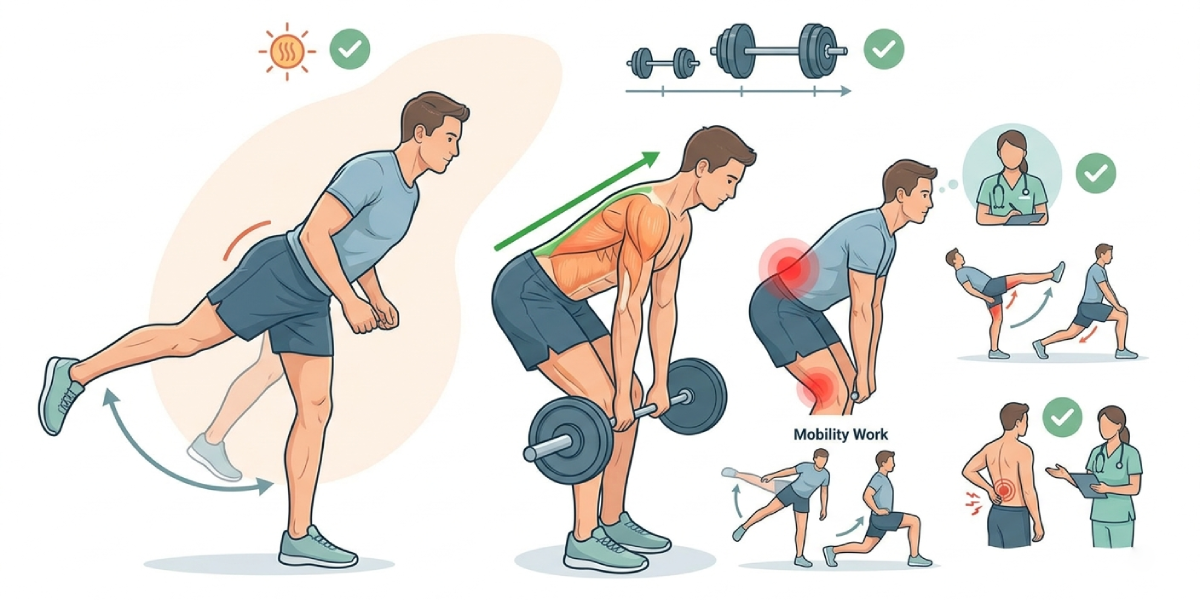
Single-Leg RDL
The single-leg variation challenges balance and stability while correcting muscular imbalances between sides. Stand on one leg, hinge at the hip, and allow the free leg to extend behind you as a counterbalance. This variation is excellent for athletes and anyone with asymmetrical strength development.
Dumbbell RDL
Using dumbbells allows for a more natural range of motion and is particularly useful for beginners. It also allows each side to work independently, which helps identify and address strength imbalances.
Stiff-Leg Deadlift vs. RDL
While similar in appearance, the stiff-leg deadlift involves a straighter knee position and the weight typically touches the floor between reps. The RDL maintains a slight knee bend and does not touch the floor, which creates continuous tension on the hamstrings. Both are valuable, but the RDL is generally considered more hamstring-specific.
Trap Bar RDL
Using a trap bar shifts the load closer to your center of gravity, making it a more beginner-friendly option that is also easier on the lower back. It is an excellent transitional tool for those working toward a conventional barbell RDL.
The Role of Nutrition and Recovery in Hamstring Development
No exercise program is complete without a solid nutritional foundation. Building stronger hamstrings through the RDL exercise requires adequate protein intake for muscle repair and growth, sufficient total calories to support training, and strategic carbohydrate intake around workouts to fuel performance and recovery.
Protein synthesis is the process by which muscle fibers repair after being broken down through training. Consuming 0.7 to 1 gram of protein per pound of body weight daily is a widely supported guideline for individuals engaged in resistance training.
If you are unsure whether your nutrition is aligned with your fitness goals, using tools like a BMI calculator can be a helpful starting point for assessing your overall health status alongside your training efforts.
Sleep and active recovery are equally important. The hamstrings are a large, dense muscle group and require 48 to 72 hours of recovery between intense sessions. Foam rolling, stretching, and light movement on rest days can improve blood flow and reduce soreness without impeding recovery.
Safety Tips and Injury Prevention
The RDL is a safe and highly effective exercise when performed correctly. Keep these safety considerations in mind:
- Always warm up before loading the RDL. Light cardio, dynamic hip stretches, and bodyweight hip hinges prepare the joints and muscles for loaded movement.
- Progress weight gradually. A 5 to 10 pound increase per week is a reasonable pace for most intermediate lifters.
- If you experience sharp pain in the lower back or behind the knee, stop immediately and consult a qualified professional.
- Prioritize mobility work for the hamstrings and hip flexors, as tightness in these areas limits your range of motion and forces compensatory movements.
- For those with existing lower back issues, consulting a physical therapist or certified strength coach before beginning RDL training is always a sound decision.
Integrating the RDL into a broader health and wellness routine that includes cardiovascular fitness, flexibility training, and proper nutrition produces the best long-term outcomes for both performance and injury prevention.
How Long Before You See Results?
With consistent practice, most people begin to notice improvements in hamstring tightness and control within two to four weeks. Visible strength gains typically appear within six to eight weeks of regular training. Significant changes in muscle size and definition, often called hypertrophy, generally require at least 8 to 12 weeks of progressive overload combined with proper nutrition and recovery.
The key variable is consistency. Performing the RDL exercise with good form, progressive loading, and adequate recovery is a formula that delivers reliable, lasting results over time.
Frequently Asked Questions
What does RDL stand for in exercise?
RDL stands for Romanian Deadlift. The name comes from Romanian Olympic weightlifters who popularized the movement as an accessory exercise in the early 1990s. It is a hip-hinge movement specifically designed to load and strengthen the hamstrings and glutes through a controlled range of motion.
Is the RDL exercise good for beginners?
Yes, the RDL exercise is suitable for beginners when started with light weights and proper coaching cues. Beginners are encouraged to start with dumbbells or even a broomstick to practice the hip hinge pattern before progressing to heavier loads. Learning the movement with good form from the start prevents bad habits that are difficult to correct later.
How is the RDL different from a conventional deadlift?
The main differences are knee angle, range of motion, and muscle emphasis. The RDL keeps a soft knee bend and stops before the weight touches the floor, maintaining constant tension on the hamstrings. The conventional deadlift begins from a dead stop on the floor with greater knee flexion and more quad involvement. The RDL is more hamstring-dominant, while the conventional deadlift distributes the load more evenly across the entire lower body.
How much weight should I use for the RDL?
Start with a weight that allows you to complete all reps with perfect form and still feel the stretch in your hamstrings at the bottom. For most beginners, 20 to 40 percent of their body weight is a good starting range. As form improves and strength develops, the load can be increased gradually. There is no universal target weight — the right weight is one that challenges you without compromising technique.
Can the RDL help with lower back pain?
When performed correctly, the RDL can strengthen the posterior chain muscles that support the lumbar spine, which may help reduce chronic lower back pain over time. However, if you currently have acute lower back pain or a diagnosed spinal condition, you should consult a medical professional or physiotherapist before adding RDLs to your routine. Performed with poor form, the RDL can aggravate existing back issues.
How often should I do the RDL exercise?
Most people benefit from performing the RDL two times per week, with at least 48 hours of rest between sessions to allow for hamstring recovery. More advanced lifters may train it up to three times per week with varied intensity. Training frequency should be matched to your recovery capacity, overall training volume, and fitness goals.
Should I use a belt when doing the RDL?
For most training scenarios involving moderate weights, a belt is not necessary. Building natural core strength and bracing technique without a belt is important, especially for beginners and intermediate lifters. A weightlifting belt may be appropriate for maximal or near-maximal loads in advanced training, but it should supplement good core mechanics rather than replace them.
What are the best exercises to pair with the RDL for hamstring development?
The RDL pairs well with leg curls (lying, seated, or standing) for targeted hamstring isolation, hip thrusts and glute bridges for glute strength, good mornings for spinal erector development, and single-leg exercises like Bulgarian split squats for unilateral strength and balance. Together, these movements create a comprehensive posterior chain training program that promotes balanced strength, stability, and muscle development.